Building a Single Server Patch
Introduction In this tutorial, we will build a single server patch together so you can get to grips with how Game Patch Creator works at
Every time your user runs your patcher, it will log every detail it possibility can down in a log file, should the patcher crash or an error occur, this log file is saved automatically to the user’s hard drive.
You can instruct your user to look under their %appdata% folder, then locate a folder called game_patches and then a folder inside there with the title of whatever your game patcher window title is. So for example, first you tell them to open an explorer window and type in:
Type in %appdata% then press Enter. It will reveal a folder in there called game_patches, they need to go into there, then into a folder named after your patcher title. So if your patcher window title is “My Game Patcher” then there should be a folder in there, called that.
Inside there will be the debug logs. The filenames are dated and timestamped, so you will need the latest one from them.
They are dated like so:
11_3_2020 x 16-1-x-debuglog
month_day_year x hour–minute-x-debuglog
Now let’s take a look inside the debug log.
At the opening of your Log file, will be the commandline sent and all the initialisation checks the patcher does. Let’s break this down for you.
![]()
This indicates at what time and date the patcher was run from the user’s computer. This is in the current time/timezone and date of the user’s computer.
It will also list the commandline sent, if any.
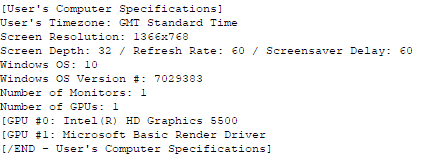
Next up, the patch log will generate a list of the user’s computer specifications. This allows you to see what kind of machine they are running for the patcher. It will list:
This information is not usually necessary but it gives you a good idea of their machine and it helps us devs should the problem be something we need to fix.

This is the first part of the patcher initialisation. It will check if the file integrity check command line switch has been sent. It will also load up the default (gpcsgs – settings file) which should be in the same folder as the launcher, unless you are:
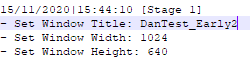
In this stage the patcher is initialising some of the basic setup such as Window Title, Window Height and Widths.

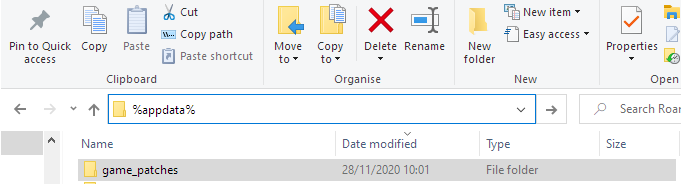
At Stage 2 of the intialisation, the patcher will attempt to create the temporary directory for the patcher. It will always write to the User’s “Application Data Folder” which is typically under C:\Users\%Username%\AppData and inside there, it will create a folder called game_patches then a folder inside there with the name of the Window Title of your patcher.
So for example, if your Window Title is called ‘My Game Patcher’ the path would typically look like:
C:\Users\User\AppData\game_patches\My Game Patcher\
You can always get your users to access this folder by typing %appdata% into the Start Menu and pressing enter.

This initialisation stage will determine if there is a splash screen and pre-executables, if there is, which order are they run in. The patcher shouldn’t really bomb at this point.

If a splash screen is enabled, it will now check what it needs to setup. If it is a downloadable splash screen from your server, the patcher will download that image to the temporary patcher directory here, ready for us. If it’s a local file, it will check this exists.
This section is in active development and not available yet. This will not cause any problems.
This section checks if the patcher is a silent patcher. You can determine this through the patcher settings or you can send this command via a commandline switch to force the patcher to go in/out of silent mode.
![]()
This section checks what the current setup of the patcher is. Is it a single server or multi-server setup. The patcher shouldn’t really bomb at this stage.
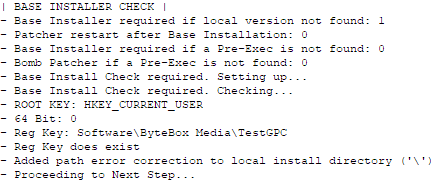
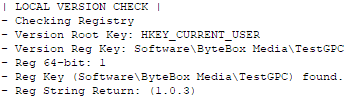
This stage sets up the requirements for a base installer and detects the base installer URL. It will also check the current installation directory through the registry, if this has been set as a requirement.
This stage of the initialisation will check the current version of the installed version of the game. These are not the ‘hard checks’, this is more for the base installer requirement, if it’s required. The hard check of the local version against the remote version is done in the patching stage.
![]()
This stage of the initialisation checks will see which method of patching has been chosen, is it block or file-by-file.
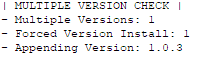
This stage will determine if multiple versions are enabled and will also check for the Forced Version Install flag to see if it’s been sent via the commandline. If it has, it will sort out and append the selected version forced to install via the commandline.
![]()
This stage will check what the custom extension is, if set to be used. If this is blank, the default gppc will be appended to all downloadable files from the servers.
Once the patching process has started, you can debug through here.
This stage is the first stage of the patching process. The patcher will setup the URLs to download the patch files from initially. This URL can change further down dependent on a few variables such as multi-server and multi-version appending. If the user is to select a server, this will be logged here in this section.
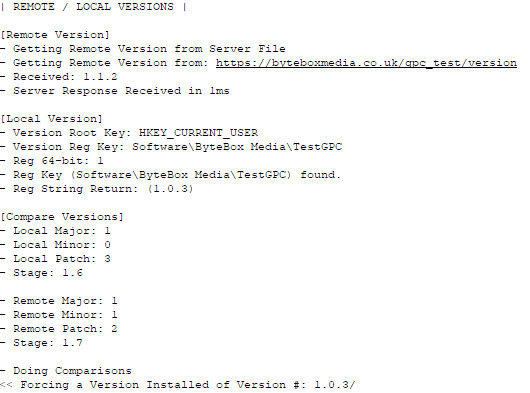
This is the hard version check stage. The patcher will locate where the local version information is stored (file/ini/registry). It will also download the remote version from your server file (or PHP script).
The patcher will then do a comparison between the two versions and determine if there is an update available or not.
If you have forced a particular version install, or just want to do a file integrity check, this stage may still be performed.
At this stage, the patcher will try to obtain the correct patch file list it needs to compare the currently installed files against.
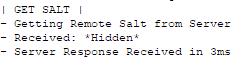
This stage is where the patcher will try to obtain your remote salt file from online. It will hide the salt received so it isn’t exposed to the user and they cannot try to spoof or modify it.
At this stage, the patcher will attempt to load the data from your patch file list it downloaded earlier. It will collate all the information into an array it can read through line-by-line to independently check each file.
![]()
This is the main patching process. If your user has reached this stage, then everything else beforehand must be ok and good to go. However, this is also the stage at where most errors can occur. We will explain this patching process, which is repeated for every file.
What we will detail here, is the process that is repeated for each file.
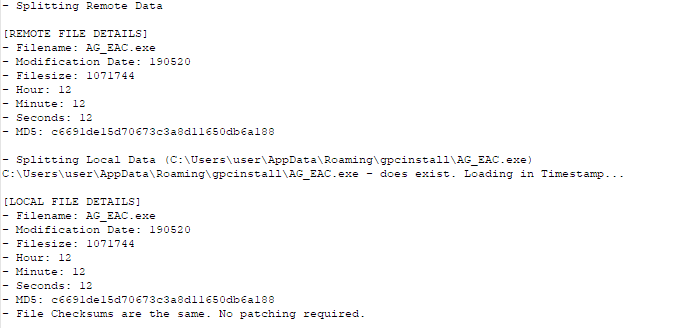
First, the patcher will split up and read the patch file data for the remote file. This is what was generated inside the patch file list. It consists of the modification date (Format: date/month/year), Filesize (in bytes), Timestamp and the final MD5 checksum by combining all this data and your salt.
The patcher will then try to locate this file on the user’s computer. If it doesn’t exist, it will mark it as ‘doesn’t exist’ and then attempt to download that file. If it does exist, the patcher will do the same as above but for the local file.
If the local file does exist it will compare the checksum of the local file installed to the checksum of the remote file. If they’re the same, the patch knows it doesn’t need to update that file. If it differs, it will mark the file as “different” and it needs patching.
At this point the patcher will determine, is this file-by-file patching or block patching? If it is file-by-file patching, it will immediately begin to download the new, modified file, then it will replace the file on the user’s computer. It will then check the local file again to make sure it has been patched correctly.
If it has, it will move onto the next file. If it hasn’t, it may loop. Please see the bottom of this debug log to see why it could loop on the same file.
If you have selected Block Patching, the patcher will download the new file to a temporary directory and move onto the next, collating all the files in a temporary directory before patching them all at once in the final stage.
If the same file does indeed loop over and over, the patcher should automatically detect this and halt the process after two attempts but sometimes this can not be possible to do.
Once scanning and patching of all files is complete, the patcher should display ‘Patching Complete’.
![]()

This is the final part of the patching process itself. Once all files have been scanned and patched, the patcher will attempt to update the local version information to say which version is now installed. This will be the same way the patcher was able to read the initial version information (file/ini/registry).
If your patcher seems to loop on the same file over and over, it’s actually quite easy to debug yourself. This is almost 99% of the time, down to user error, either with your setup, your files or your patch file. Let’s try and break down an example and how you can debug this issue yourself.
If your game/app is or could be installed to a location other than the user’s appdata folder, such as Program Files or allowing the user to enter their own install location, then you will need to ensure you are running the Admin version of patcher. This will raise elevation for the patcher and grant it access to these special areas of their hard drive.
If you try to run an invoke patcher and the user has installed to Program Files or any other area that requires permissions, it just won’t be able to copy the file to patch it has downloaded. It could end up in a loop.
If your patcher is looping on a particular file, it’s more than likely an issue with either your patch file or the remote file on the server. Let’s take a look at this example here and how you can debug the issue on this particular file.
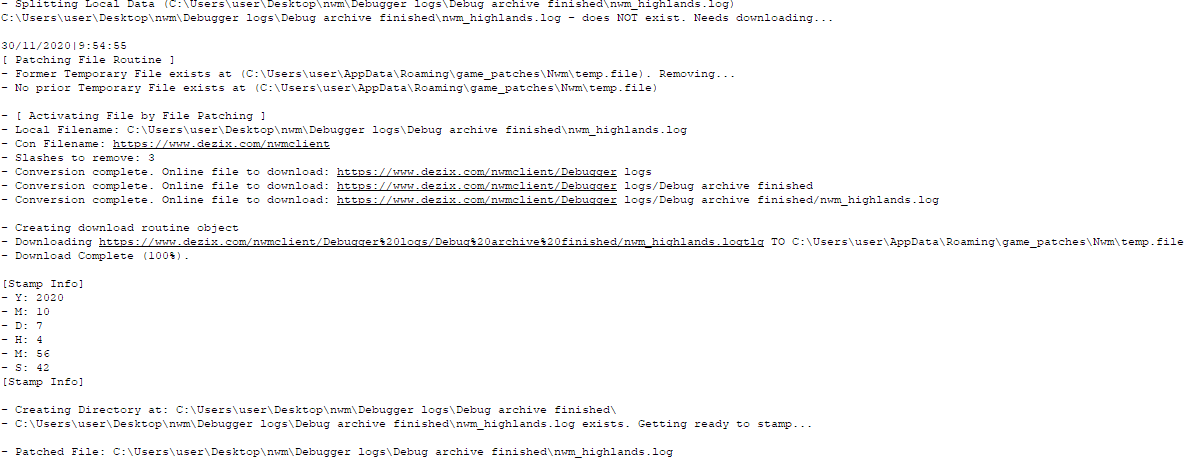
The patcher starts by [ Patching File Routine ] – it will remove the last downloaded temporary file making way for the new file to be downloaded. It will then start to assemble the download URL to download the file. The first thing to do is triple check the URL is correct, you can see where it says “Downloading: https://xxxxx TO C:\xxxxxx, copy that http/s link into your web browser and hit enter. Try and download the file in your web browser.
If you see an error page or error messages in your web browser, this is the error that the patcher will be getting to. You must ensure the folder that stores your game files is public and accessible for the files to be downloaded. You can do this by looking at the main folder permissions inside your FTP or your .htaccess file for that directory could be blocking the connection.
You can then see the stamp info, this is the filestamp information of the downloaded file. It consists of
At the top of your debug log, you should see the link to the PATCH FILE LIST the patcher downloaded. Download this patch file list yourself then compare the file in question to the one on your server to ensure it is correct.
Steps to debug patching error:
![]()
N.B – This is the Windows Size (in bytes) NOT Size On Disk!
Here is an example of our test patcher…
![]()
![]()
The top image shows our AG_EAC.exe file information inside our patch file. The bottom image shows the AG_EAC file on our web server.
The line for the AG_EAC.exe line in our patch file, shows us the information about that file in this order:
Filename#Modified Date#Filesize#Timestamps#MD5 Checksum
So as you can see the filesize for our file is 1,071,744 bytes in our patch file list and the file on the server is correct. So this should work (and it does). However, if yours is different you must have uploaded the wrong file (or your server is has gzip compression enabled).
If your webserver has GZIP enabled, disable it. This causes an invalid output and will compress the binary inside your file, it will cause a constant error for the patcher.
When you are uploading your patch files via FTP, do not choose ‘auto’ for the transfer type. Because your information inside your config file is encrypted for security, FTP programs cannot tell what encoding the file is written in, so you must ensure you choose ‘Binary’ or ‘UTF-8’. ASCII or any other option may cause issues with your patch file not working.